Virtual Networks over Linux (VNX) is an open-source network simulation tool that builds and modifies virtual network test beds automatically from a user-created network description file. In its current version, VNX supports several different virtualization methods: KVM, user-mode linux, and DynaMIPS.

VNX was developed by the Telecommunication and Internet Networks and Services (RSTI) research group of the Telematics Engineering Department (DIT) of the Technical University of Madrid (UPM).
In this post, we will run through one of the example scenarios prepared by the VNX project team and take a first look at how VNX works.
VNX and VNUML
VNX replaces VNUML (Virtual Networks over User Mode Linux), which is the previous version of the network simulator created by the Technical University of Madrid. VNX integrates new virtualization platforms, in addition to user-mode linux, to allow virtual machines running other operating systems (Windows, FreeBSD, etc), apart from Linux. VNX uses libvirt to manage the virtualization capabilities of the host. Libvirt supports the use of most of the virtualization platforms available for Linux, although KVM, UML and DynaMIPS are the only ones documented by the VNX team.
VNUML is still of interest because the documentation for VNUML is more complete and there are more prepared example scenarios available for VNUML. Where you find incomplete VNX documentation or are looking for a prepared example scenario to analyze or to run ((You may be able to modify VNUML network description files to work with VNX)), you may also check the VNUML web site and use a search engine to search for "VNUML".
Installing VNX
I describe the procedure for installing VNX and root filesystems in a previous post.
Distributed VNX
VNX supports a distributed configuration that allows the deployment of virtual network test beds over clusters of Linux servers, allowing for scenarios made of a large number of virtual machines.
VNX network scenario description files
The VNX program parses a network scenario description file, then builds and manages the virtual test bed based on the information in the file. The file contains information in a XML format described in the VNX language specification language
The network scenario description file describes the nodes that will be started by VNX and the root filesystems used by each node. It also describes the networks that VNX will create to connect the virtual nodes to each other.
Prepared command sequences
The VNX scenario file may also describe commands that are executed on each virtual node to set up the operation of each node. Additional commands can be defined in the file and referenced with an XML tag so each set of commands can be executed by the user through a VNX command while the scenario is running.
The ability to create prepared sets of commands, each referenced by a unique XML tag in the scenario description file, is a useful feature of VNX. An educator who is interested in testing the operation of protocols in a network but wants to hide the complexity of the configuration commands (to ensure all students see the same results, for example) can prepare sets of commands for students to execute by a VNX command referencing the appropriate tag in the scenario file. As another example, a researcher who is testing new software could create a repeatable automated test scenario using prepared command sequences.
The Ubuntu Tutorial
The VNX project provides a set of scenario description files as examples. The example files are stored in the /usr/share/vnx/examples/ directory. Most of these examples are simple scenarios that each start one node — each scenario uses a different root filesystem for the virtual node — and connects it to the host via a network connection.
To evaluate VNX, we will walk through a more complex network scenario called the Ubuntu Tutorial that creates six virtual nodes that will emulate four host computers (h1, h2, h3, and h4) and two routers (r1 and r2), all connected by three virtual switches (Net0, Net1, and Net2). The host computer that is running the simulation connects to the virtual nodes via an additional virtual switch (Net3) connected between the host computer and the virtual router r1.
The Ubuntu Tutorial scenario is well documented on the VNX web site.
The diagram below, reproduced from the VNX web site, shows the network topology of the Ubuntu Tutorial example scenario.
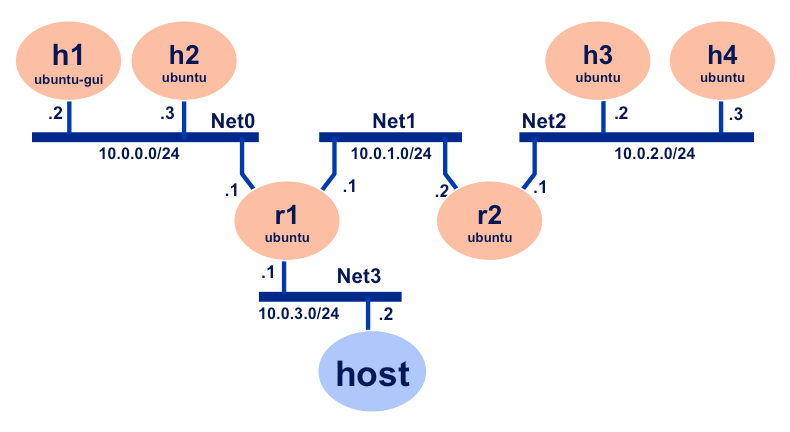
All virtual nodes except h1 use an Ubuntu server root filesystem (command-line interface, only). Virtual host h1 uses an Ubuntu Desktop (with a GUI) so we can start a web browser on virtual host h1. We previously downloaded and installed the Ubuntu root filesystems used by the Ubuntu Tutorial. Please see the Installing VNX post for details.
Start the Ubuntu Tutorial scenario
To execute a prepared network scenario, run VNX with the correct network scenario description file. In this case, we enter the commands:
$ cd /usr/share/vnx/examples
$ sudo vnx -f tutorial_ubuntu.xml -v --create
The VNX program will start six virtual machines using KVM virtualization. It takes some time for the scenario to start. In my case, it took about four minutes for all six virtual machines to complete starting and present a login prompt. Each virtual machine will start, then set up the VNX autoconfiguration and command execution (ACE) daemon, then restart, then present a login prompt, indicating the VM is ready.
When the virtual machines have completed starting up, log into each virtual machine console. On each machine, the userid is “vnx” and the password is “xxxx”. The screenshot below shows all the VNX console windows after each machine has started.
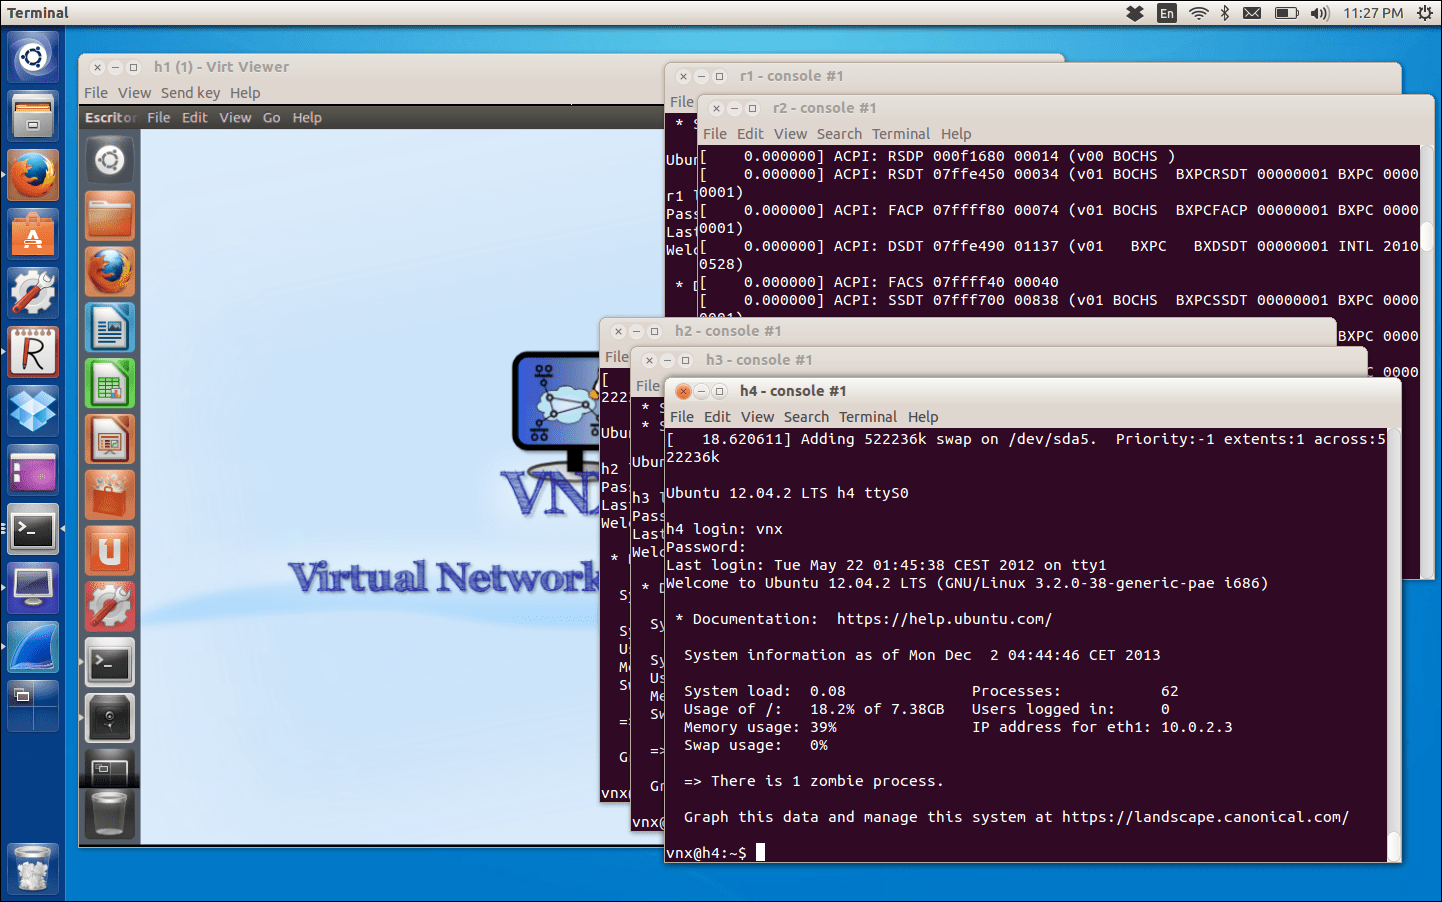
We see that the host h1 is running with a GUI console and all other nodes in the scenario are running with command-line consoles.
Start Wireshark
We will start the Wireshark network analyzer to monitor network traffic passing between nodes in the network. The Ubuntu Tutorial will cause HTTP traffic to pass between host h1, and one or both of hosts h3 and h4. We can see that a good place to capture traffic between these nodes would be on one of the virtual routers, such as the interface r1-e1.
To start Wireshark, we execute the following command on the host computer:
$ sudo wireshark &
We started Wireshark with superuser privileges (using the sudo command) so we can access the network elements started by VNX, which runs as root.
In the Wireshark configuration panel, select interface r1-e1 and click the Start button to start capturing packets.

Start the web servers
The tutorial_ubuntu.xml file describes command sequences that configure the nodes created by the scenario. When VNX started the scenario, some of these command sequences installed default routes on the virtual hosts and static routes on the virtual routers. The scenario file also provides command sequences that can be executed by the user after the scenario has started. One of these command sequences will start web servers on hosts h3 and h4.
To instruct VNX to run the command sequences on hosts h3 and h4 in this scenario, run the VNX command:
$ sudo vnx -f tutorial_ubuntu.xml -v -x start-www -M h3,h4
Start Firefox on the host h1
Start Firefox on the GUI console attached to virtual host h1. Access the GUI console for virtual host h1 and start Firefox by clicking on the application icon in the launch bar running on the virtual machine. Then, in Firefox running on h1, enter the URL “10.0.022” to connect to the web server running on h3, which has an IP address of 10.0.2.2/24 in this scenario. This will generate HTTP network traffic between h1 and h3 over the simulated network. The web page stored on h3 will appear in the browser window on h1.

Alternatively, the network scenario description file describes a command sequence to start Firefox and navigate to a web page on h3.
If you want to use VNX to start Firefox on h1, execute the following command on the host computer terminal:
$ sudo vnx -f tutorial_ubuntu.xml -v -x www-h3
This command sequence will open Firefox on h1 and make Firefox request the web page from the URL, “10.0.2.2”.
Review the packets captured by Wireshark
Now look at the Wireshark window. We should see some packets have been captured. Look for the HTTP response packets and you will see the HTTP requests and response messages exchanged between h1 and h3. One of the packets will contain the contents of the web page that is sent from the web server on h3 to h1.

Other tests
To test some simple network operations, we might execute traceroute or ping commands. For example: if we run traceroute on h2 to see the L3 path between h2 and h4, we access the h2 console window and run the following command on h2.
h2:~$ traceroute 10.0.2.3
traceroute to 10.0.2.3 (10.0.2.3), 30 hops max, 60 byte packets
 1  10.0.0.1 (10.0.0.1)  1.462 ms  1.062 ms  1.070 ms
 2  10.0.1.2 (10.0.1.2)  6.393 ms  6.097 ms  5.814 ms
 3  10.0.2.3 (10.0.2.3)  5.528 ms  5.251 ms  4.853 ms
Shutting down the scenario
When using the shutdown VNX command to stop a scenario, VNX will save the configuration of each virtual machine in the scenario. When the same scenario is started again, any files you modified on the virtual machines will remain as you left them. This is useful when building configurations in a network scenario.
VNX creates a directory for the running scenario and saves copy-on-write (COW) files to this directory for each virtual machine. Each COW file records the files modified on each virtual machine. In the Ubuntu Tutorial scenario, the directory created by VNX is /root/.vnx/scenarios/tutorial_ubuntu/.
To list the contents of the scenario files, use the command:
$ sudo ls -la /root/.vnx/scenarios/tutorial_ubuntu/vms
total 32
drwxr-xr-x 8 root root 4096 Dec  1 22:29 .
drwxr-xr-x 3 root root 4096 Dec  3 22:04 ..
drwxr-xr-x 7 root root 4096 Dec  3 21:40 h1
drwxr-xr-x 7 root root 4096 Dec  3 21:19 h2
drwxr-xr-x 7 root root 4096 Dec  3 21:19 h3
drwxr-xr-x 7 root root 4096 Dec  3 21:19 h4
drwxr-xr-x 7 root root 4096 Dec  3 21:19 r1
drwxr-xr-x 7 root root 4096 Dec  3 21:19 r2
To shut down the Ubuntu Tutorial scenario and preserve file changes made while the scenario was running, execute the command:
$ sudo vnx -f tutorial_ubuntu.xml -v --shutdown
To restart the scenario later, with all configuration file changes still intact, run the command:
$ sudo vnx -f tutorial_ubuntu.xml -v --create
Purging a scenario
When you want to erase all changes to the Ubuntu Tutorial scenario, and delete the directories created by VNX for the scenario, use the destroy VNX command.
sudo vnx -f tutorial_ubuntu.xml -v --destroy
Other VNX commands
Some other VNX commands support managing individual virtual machines and other management functions. For example:
Show the scenario map
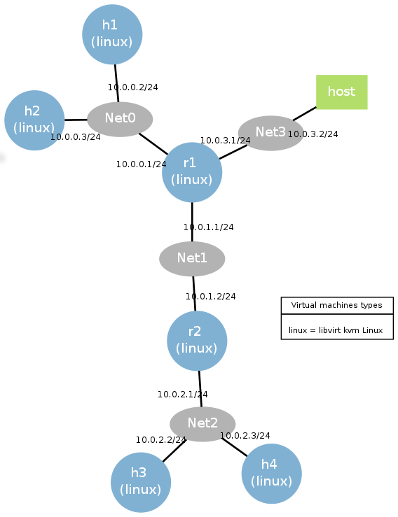
To print out a network map of the network scenario, execute the show-map VNX command:
$ sudo vnx -f tutorial_ubuntu.xml -v --show-map
In the Ubuntu Tutorial scenario, the command will display the map image on your host computer’s desktop.
Start or stop individual virtual nodes
You can shutdown, restart, suspend, or resume the operation of individual virtual nodes in the scenario by using the -M flag and the virtual node’s name in the VNX command.
For example: to shutdown and the restart virtual router r1, execute the commands:
$ sudo vnx -f tutorial_ubuntu.xml -v --shutdown -M r1
$ sudo vnx -f tutorial_ubuntu.xml -v --create -M r1
Suspending a virtual node might be useful when testing networking protocols (to simulate a node failure). For example: to suspend and then to resume virtual router r1, execute the commands:
$ sudo vnx -f tutorial_ubuntu.xml -v --suspend -M h1
$ sudo vnx -f tutorial_ubuntu.xml -v --resume -M h1
Managing consoles
KVM virtual machines in VNX each have two consoles: a graphical console and a command-line console. The graphical console is con0. The command-line console is con1.
If you close one of the consoles, you can reopen the console using one of the following commands:
For example, to re-open graphical console for h1:
$ sudo vnx -f tutorial_ubuntu.xml -v --console con0 -M h1
For example, to re-open the command-line console for h2::
$ sudo vnx -f tutorial_ubuntu.xml -v --console con1 -M h2
Conclusion
We tested the operation of the VNX Linux network simulator using one of the example scenarios prepared by the authors of VNX.
VNX users can create network scenario description files in a text editor using the XML syntax defined by the VNX authors and can start complex network scenarios from just one scenario file. The VNX tool also supports the execution of command sequences described in the scenario file so users can define an initial state for the simulation and also define command sequences that can be launched by the user when testing the scenario.
Based on the activity in the VNX/VNUML mailing list, it appears that VNX is used by a small community of researchers and educators. Members of the VNX team respond to questions posted to the mailing list so the project is active. The most recent release (as of the time this post was written) was in July 2013. The VNX documentation is adequate but is incomplete.